Perhaps you have a set of processing scripts and some datasets that take forever to process on your local machine, and want to accelerate the workflow by transferring them to the cluster for setup as a SLURM job submission.
Or maybe you already have that workflow established on the cluster, and prefer to transfer the outputs back to your local machine for interactive work like creating a visualization and incorporating the results in a paper.
Whether you are trying to upload to or download from the cluster, the CRC ecosystem supports a multitude of file transfer options that may be accessed via the command line or GUI-enabled SFTP clients. For a list of recommended tools, and more examples see our user manual section on data management
Some of the most simple and efficient tools for file transfer are built-in and freely available to you in your SSH client or terminal software. As an example, we will use scp (or "secure copy").
scp commands take the following form: scp {source} {destination} (very similar to the local copy command cp) and just require a few extra bits for making the transfer to remote host.
In this example the terminal used is MobaXterm on windows, but the command will look essentially the same regardless of your OS.
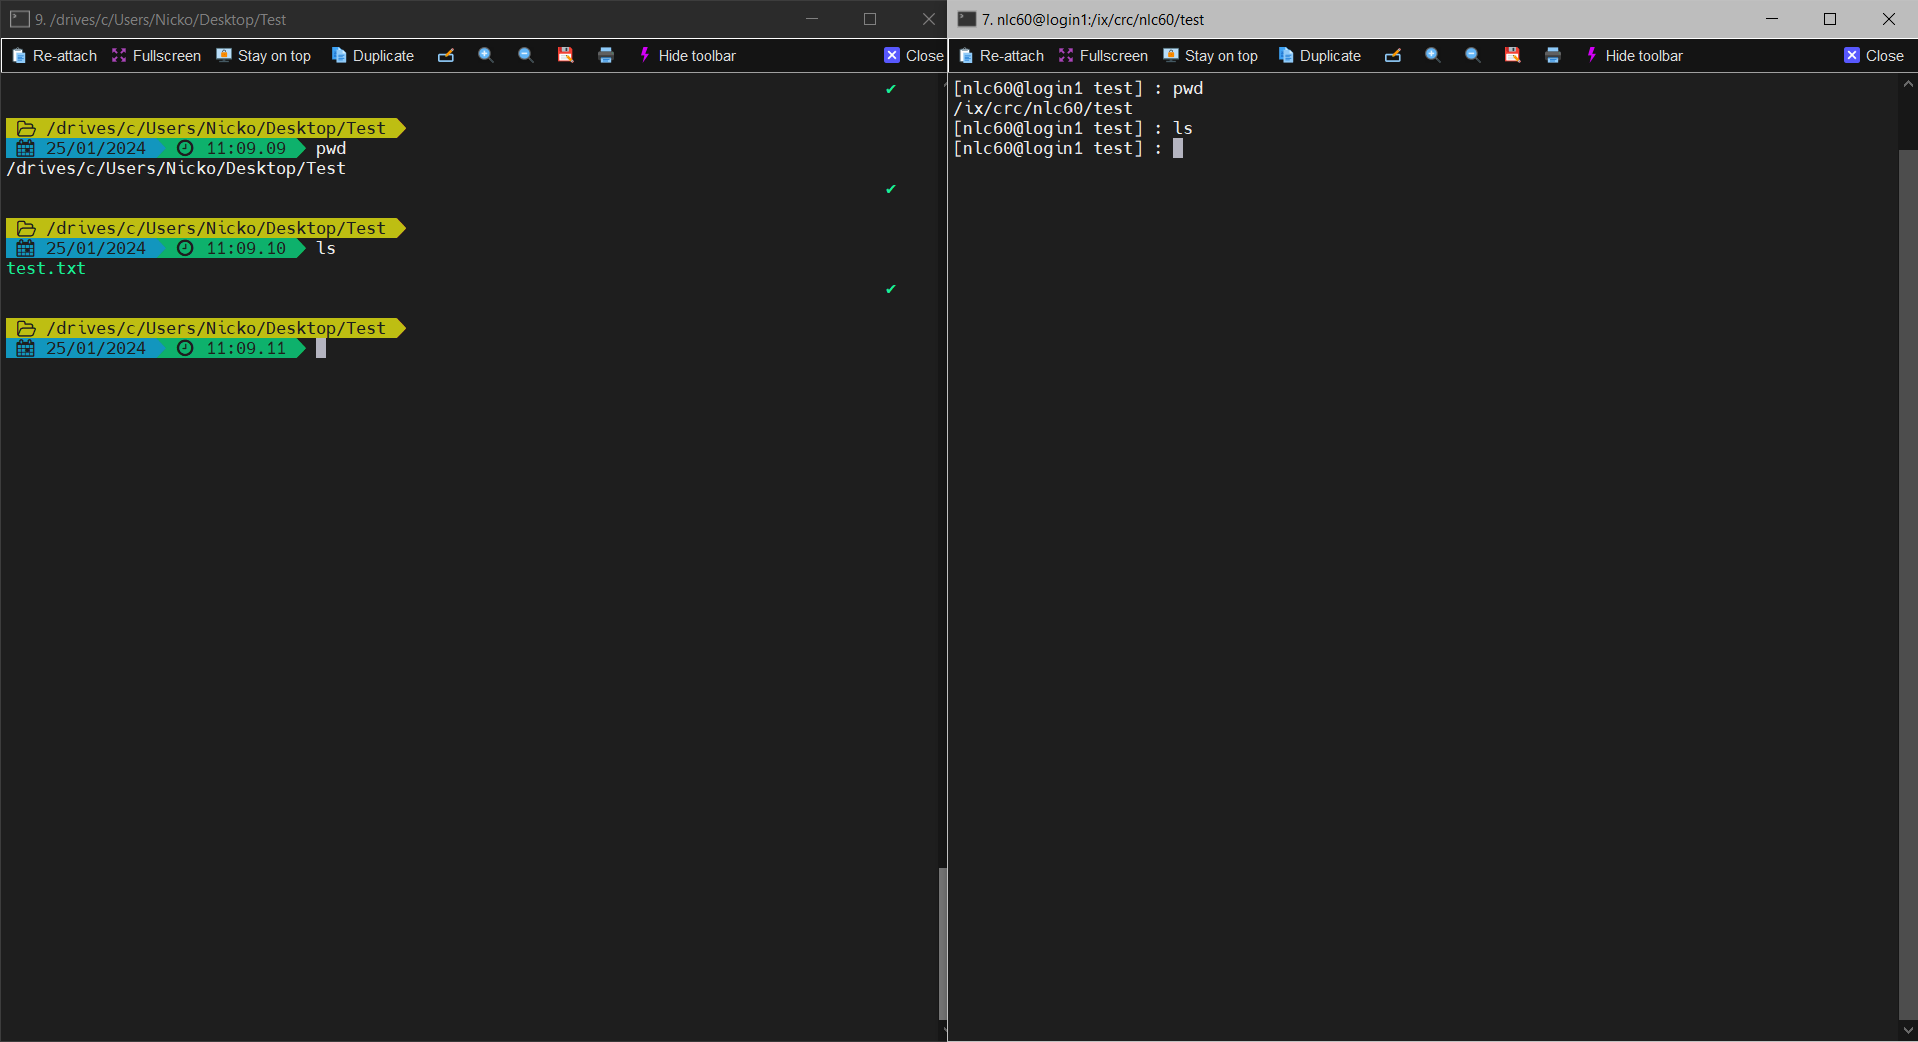
On the left is my local machine, and my working directory is a test folder containing a single text file. On the right, I've used ssh to connect to the H2P login node, and my working directory is under a /ix location for my user.
Transferring Files
As a simple upload, let's scp the test.txt file to the cluster. The format for uploading to the remote host is scp {source} {username}@{hostname}:{destination} where
sourceistest.txtin my local working directoryusernameis my username,nlc60hostnameis the H2P login node,htc.crc.pitt.edudestinationis the folder I want the file to end up in,/ix/crc/nlc60/test
Note: It's possible you will receive a prompt to trust the host's key if it is your first time connecting. In this case, you can just type yes to trust it.

When I ls again after the transfer is complete, I can see that the file is now present in directory on the cluster.
To display how downloading from the cluster works, I'll delete the test.txt file on my local machine, and scp it from the location I just uploaded it to back to my current directory.
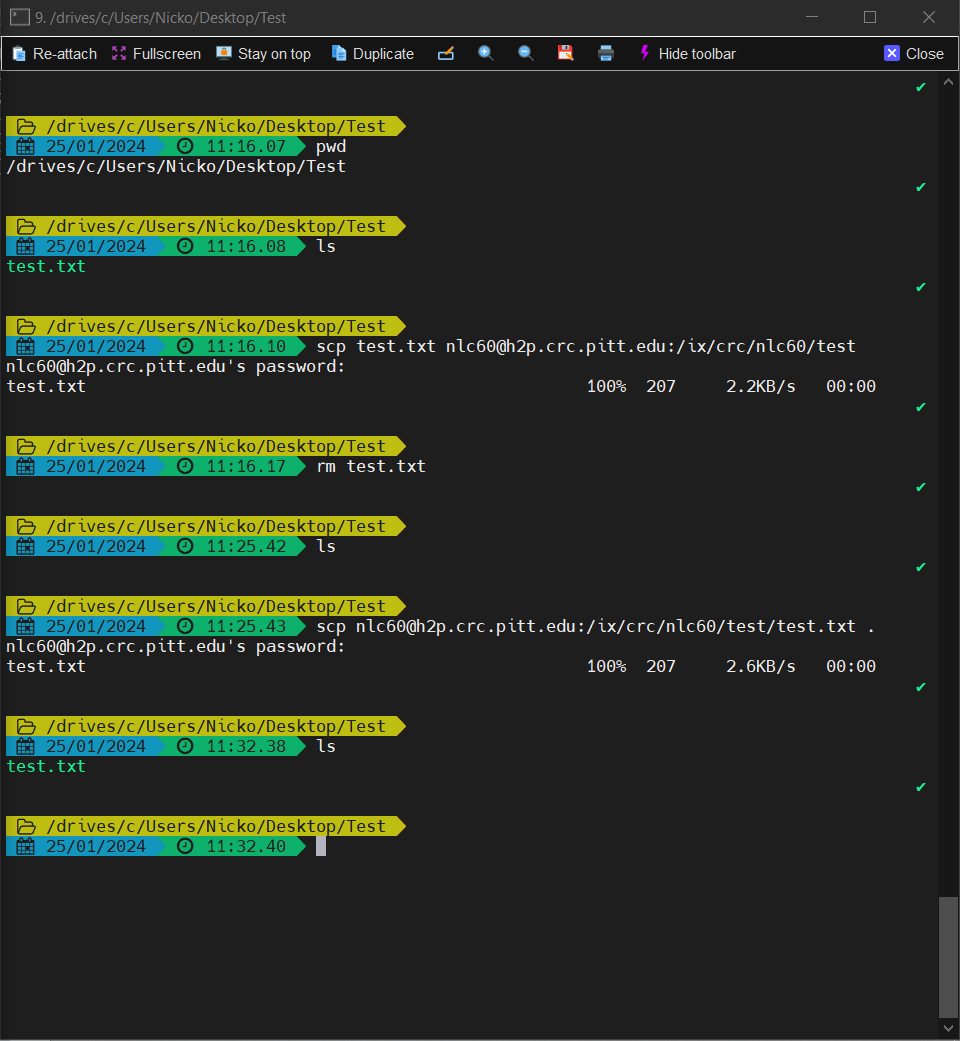
All that was required to download instead was to use the previous destination (additionally specifying test.txt) as the source, and . (shorthand for the working directory) as the destination.
You can technically scp from either host (your local machine or the login node), but it's usually easier to run on your local machine as the connection parameters like your hostname or ip address are implicitly available to the command.
Alongside command-line interface options, there are many free tools you can use to perform file transfers between your local machine and the cluster that provide a graphical user interface if you prefer. We will use FileZilla for our example here, but many other SFTP clients (WinSCP, cyberduck, etc.) will have a similar overall layout and usage.
FileZilla is a free and open source FTP client program. You can download and install it to your local computer via the quick link on their home page.
Establishing a Connection
Once installed, open the program, and you should see an interface like the one below. In this case it is the Windows version, but it should look similar if you are using macOS or Linux.
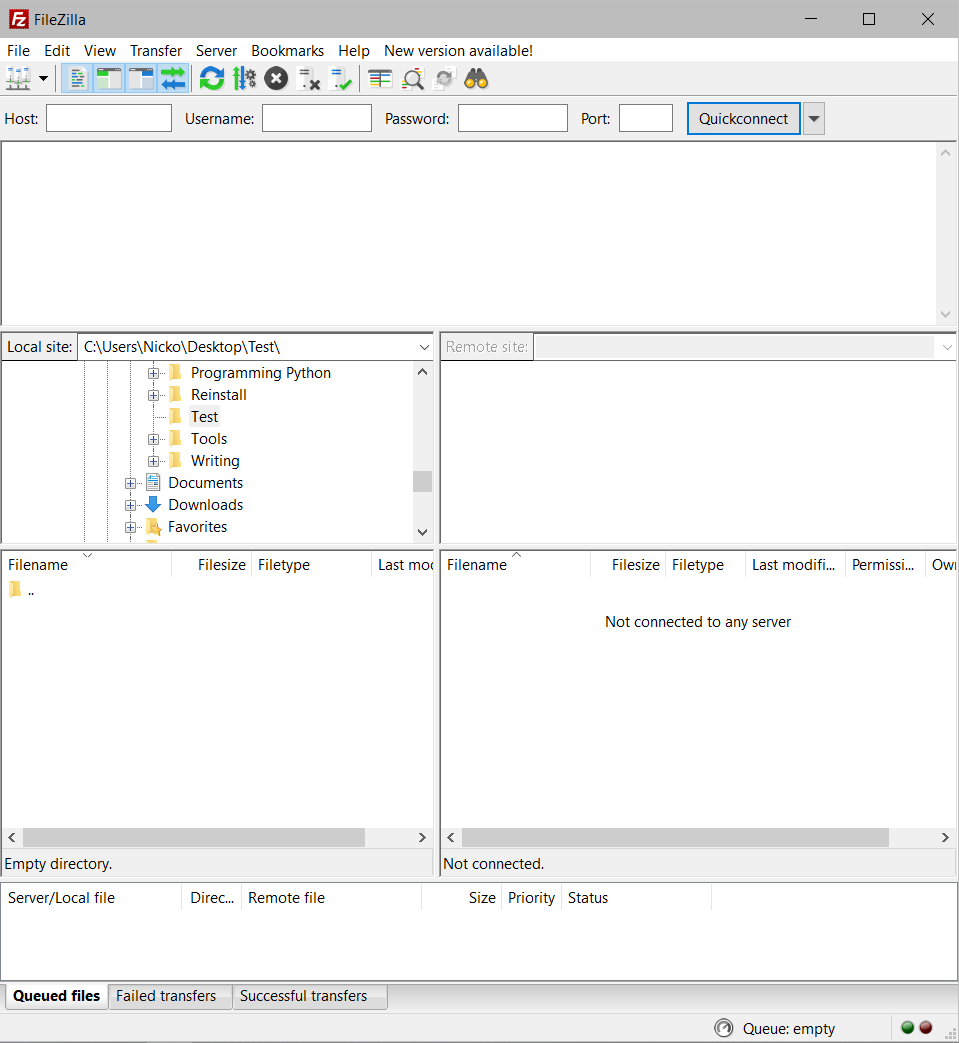
There are fields for providing arguments and viewing output related to your connection near the top, a side by side view of your working directory on the local and remote file systems in the middle, and then another panel on the bottom that shows details about your ongoing transfers.
You may already notice that connecting your SFTP client to the cluster looks a lot like connecting with an SSH client.
Like always when connecting to CRC resources, you will need to be connected to the VPN before attempting to connect.
With your VPN connection established, provide the following values as your SFTP connection parameters:
- Host:
sftp://h2p.crc.pitt.edu(you'll notice this is the hostname of the login node we've already been connecting to) - Username: your Pitt ID (i.e.
nlc60if your pitt email isnlc60@pitt.edu) - Password: your password (same as the one you'd use for pitt passport, MyPitt.edu, etc.)
- Port: this can be left empty (some servers are only open to connections on a certain port)
With these filled in, go ahead and click Quickconnect.
If this is your first time connecting, you may immediately be prompted that the server's host key is not in your local computers list of known hosts. This is a security measure to protect you from connecting to some random server, and this might happen each time you point your client at a different CRC login node (h2p.crc.pitt.edu, htc.crc.pitt.edu).
Click OK to trust and begin connecting. The top panel will start to provide output related to your connection status. Importantly, if the connection fails, this is where you will be able to see error output.
Transferring Files
If you connected successfully, the remote site panel should now display the filesystem on the cluster, with a working directory of your home directory.
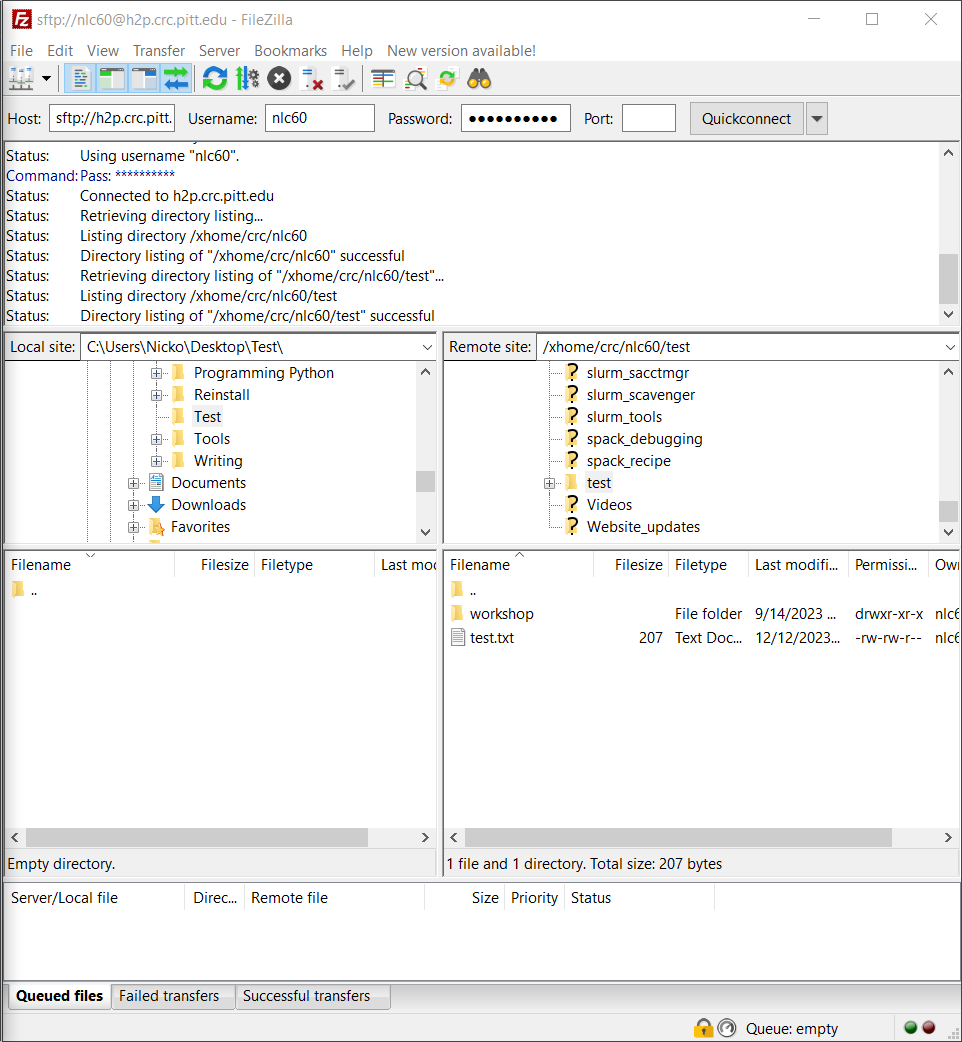
You can use the fields containing the path to your current working directory to specify a new directory. This is like performing a cd in the command line.
You will likely be moving things directly to and from your home directory, but you could also specify a project directory like a folder under /ix or /bgfs. If you attempt to access a location that your user account on the cluster does not have access to, you should see a permission denied error like you would in a terminal connection.
Once you've found the file or directory you want to transfer in either site view, you can either:
- Right-click the entry and then click Upload/Download
- Click and drag the entry to the other site to begin the transfer.
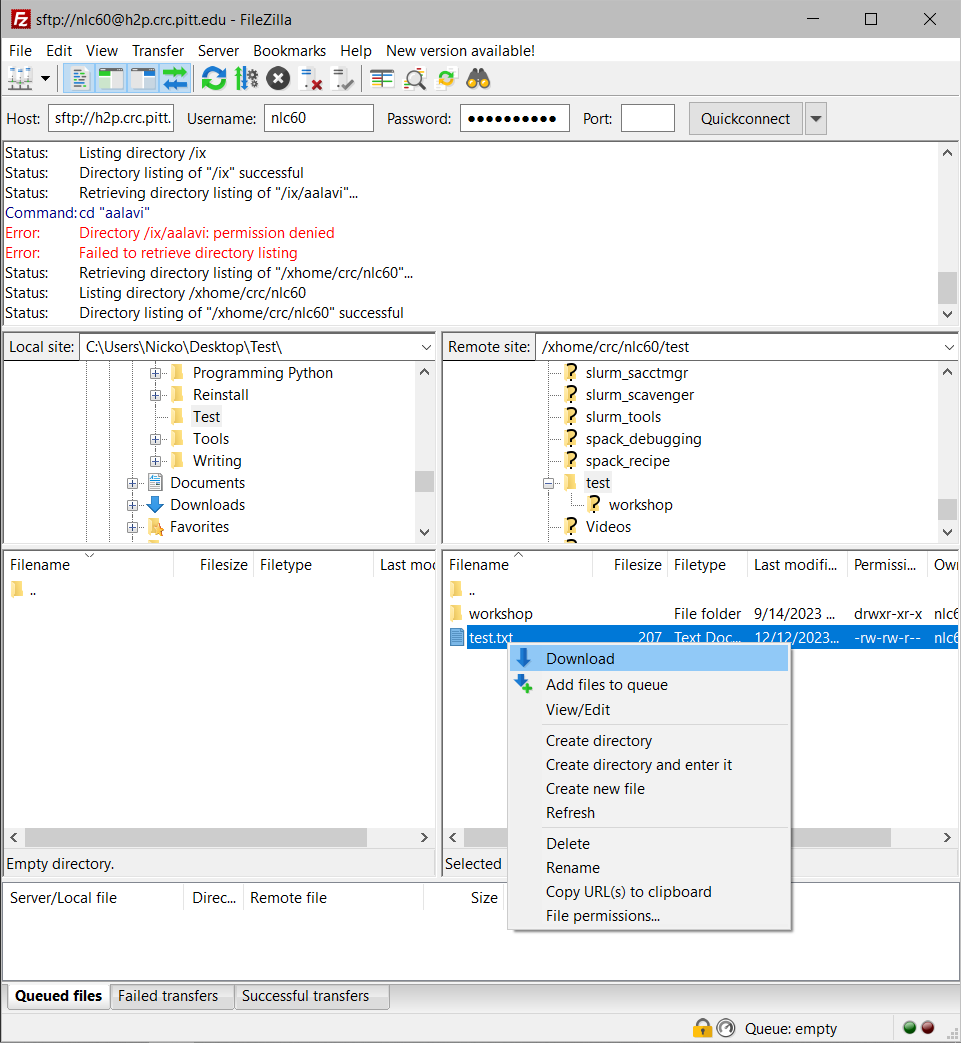
You should see the transfer details appear in the process queue at the bottom of the window. If a transfer fails, you can find more information about why in the Failed Transfers tab under the process queue.
- Website Home: https://crc.pitt.edu
- Getting Started: https://crc.pitt.edu/getting-started/requesting-new-account
- User Manual: https://crc-pages.pitt.edu/user-manual/
The best way to get help on a specific issue is to submit a help ticket. You should log in to the CRC website using your Pitt credentials first.